1. Introduction
In this tutorial you are going to learn how to create a spritesheet in Texture Packer and use it to create an animation of a walking character in a simple Starling application.
What skill level is expected of you? Using TexturePacker is extremely easy, however the Starling implementation requires an intermediate knowledge of ActionScript3, of the Starling framework and an understanding of Object Oriented Programming.
A sprite sheet (also known as texture atlas) is typically a large bitmap image that includes multiple images (also called sprites). We are going to use our sprite sheet to include the frames of an animation, a background image and two buttons.
This picture shows what we are going to achieve in this tutorial, click on it to see a live version of the end result:

Also, if you want you can download an archive with all the project’s file from here.
Let’s begin our journey with some prepping up.
2. Preparation
You know what they say: preparation is 50% of the work, so before starting let’s get all our tools ready.
Much like a cooking recipe here’s a list of the ingredients we’ll need to prepare our tasty dish:
- FlashDevelop IDE
- Starling Framework
- TexturePacker
Let’s start from the top of our list: first things first!
2.1 FlashDevelop
FlashDevelop is an amazing free IDE for ActionScript3. If you don’t have it installed on your machine, you can download the latest version of FlashDevelop here .
Once FlashDevelop is installed, launch it and create a new project by clicking on the Project menu:
Project > New Project… > Air Mobile AS3 App
Name it “tutorial01”

2.2 Setting up our Starling project
In order to set up a Starling project in FlashDevelop, we need to perform a few steps that can be a bit tedious. Bear with me though, when you are done it will be very easy to set up another Starling project and you’ll be able to reuse the same setup by just copying and pasting the project’s files from this tutorial.
Let’s download the Starling framework from this page:
http://gamua.com/starling/download/
Unzip the archive on your hard drive and go to the starling\bin\ directory where you will find the Starling compiled library: starling.swc .
Copy starling.swc to the tutorial01\lib\ folder in the project you just created.
Then open FlashDevelop’s Project Manager panel (View > Project Manager), navigate to the starling.swc library in the tutorial01\lib\ folder, right-click on it and select “Add To Library“.
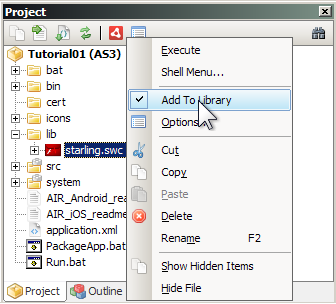
You will notice that the name of the library (starling.swc) will turn blue, to indicate that FlashDevelop now knows this is a code library.
While we are in the Project Manager, let’s look into the tutorial01\src\ folder and delete the file Main.as, this is an ActionScript class that FlashDevelop creates automatically every time a new project is created, but we won’t need it as we are going to create our own starting class in the next step.
Go back to the Starling framework you downloaded earlier, navigate to the Starling Scaffold Mobile project (samples\scaffold_mobile\src\) and copy the following two files:
- Scaffold_Mobile.as
- Constants.as
to our project’s tutorial01\src\ folder. In the Project Manager right click on Scaffold_Mobile.as and choose “Document class”:
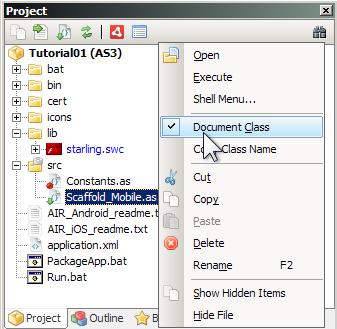
Notice that now the Scaffold_Mobile.as icon shows a tiny green arrow: that’s FlashDevelop telling us that Scaffold_Mobile.as is now our main class, the one that’s going to be executed first when we launch the application.
In the Project Manager panel, double click on Scaffold_Mobile.as to open the class in the code editor. Delete lines 22 to 24:
// We embed the "Ubuntu" font. Beware: the 'embedAsCFF'-part IS REQUIRED!!!
[Embed(source="/fonts/Ubuntu-R.ttf", embedAsCFF="false", fontFamily="Ubuntu")]
private static const UbuntuRegular:Class;
as we won’t be needing the Ubuntu font for our project.
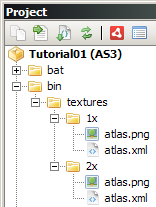
Now let’s create a new folder called “textures” in our project’s /bin/ folder, and inside /bin/textures/, let’s create two extra folders named “1x“ and “2x“.
At this point your project’s directory structure should look like this:
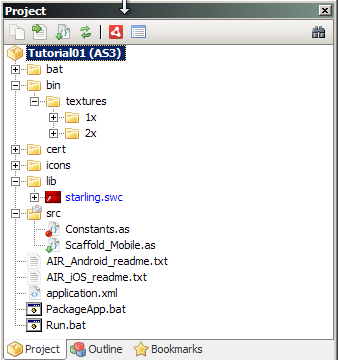
We will need these folders when we create our sprite sheets, as we will generate two different versions to allow for devices with different resolutions. To use Apple’s terminology, our “2x” sprite sheet will be suitable for ‘retina’ displays, whereas our “1x” sprite sheet will work for displays with lower resolutions (i.e. iPhone3). More on this later when we will use TexturePacker.
Lastly, let’s copy the whole “system” folder from the Starling Scaffold Mobile project (\samples\scaffold_mobile\system) to our project’s main directory. This folder contains some default images that the application will use by default backgrounds at the very beginning while everything else is loading. In order for this folder to be targeted correctly by the code in Scaffold_Mobile.as we need to tell FlashDevelop its classpath.
In FlashDevelop go to:
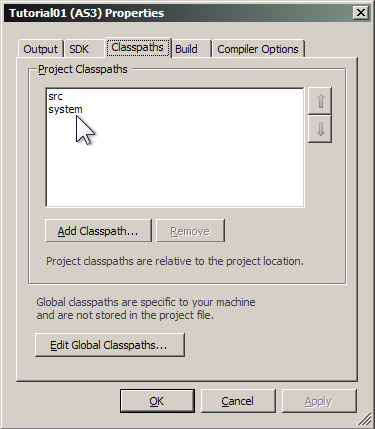
Project > Properties… > Classpaths tab > Add Classpath…
then select the system folder. Your project’s Classpaths should now look like this:
The next step is to create a new class called Root.as, this class will contain some boilerplate code to handle asset loading in Starling.
In FlashDevelop’s Project Manager, right click on the /src/ folder and choose “Add > New Class…”.

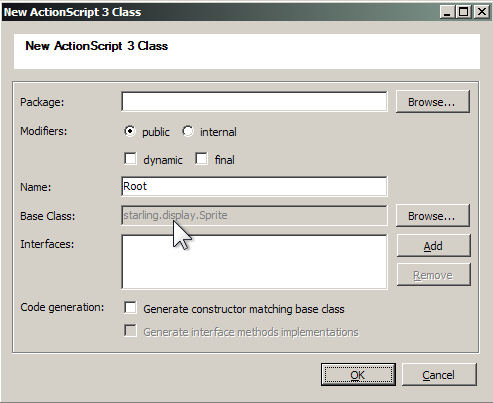
A new window will open up, name your new class “Root” and choose starling.display.sprite as Base class.
Open the Root.as class in FlashDevelop’s editor (double click on it in the Project Manager panel) and replace its content with the following code:
package
{
    import starling.display.Image;
    import starling.display.Sprite;
    import starling.textures.Texture;
    import starling.utils.AssetManager;

    public class Root extends Sprite
    {
        private static var sAssets:AssetManager;

        public function Root()
        {
            // nothing to do here -- Scaffold_Mobile will call "start" immediately.
        }

        public function start(background:Texture, assets:AssetManager):void
        {
            // the asset manager is saved as a static variable; this allows us to easily access
            // all the assets from everywhere by simply calling "Root.assets"
            sAssets = assets;

            // The background is passed into this method for two reasons:
            //
            // 1) we need it right away, otherwise we have an empty frame
            // 2) the Startup class can decide on the right image, depending on the device.

            addChild(new Image(background));

            // The AssetManager contains all the raw asset data, but has not created the textures
            // yet. This takes some time (the assets might be loaded from disk or even via the
            // network), during which we display a progress indicator.

            assets.loadQueue(function onProgress(ratio:Number):void
            {
                if (ratio == 1)
                {
                    // When all the assets are loaded we finally add our content to the stage
                    var scene:Scene = new Scene();
                    addChild(scene);
                }
            });
        }

        public static function get assets():AssetManager { return sAssets; }
    }
}
This is a standard boilerplate class that handles what happens after all our assets are loaded. The code should be self-explanatory but it is also fully commented to give you an understanding of its inner workings.
Finally, let’s locate Run.bat in FlashDevelop’s Project Manager, double click on it and add the following code at line 18:
::set SCREEN_SIZE=NexusOne
::set SCREEN_SIZE=iPhoneRetina
set SCREEN_SIZE=iPhone
This will ensure our application resolution is going to be the same as an iPhone3 (320×480 pixels) when testing the app locally (when running the app on a mobile device, the app will detect the device resolution and adapt accordingly).
Phew, this was quite long, wasn’ it? The good thing is, for the future you can just use this setup as your starting point for your Starling applications!
Now let’s move on to something more exciting and start creating our content.
2.3 TexturePacker
TexturePacker is an application that allows us to create sprite sheets in an extremely easy and intuitive way. If you don’t already have it installed on your computer you can download and install a trial version from here:
http://www.codeandweb.com/texturepacker/download
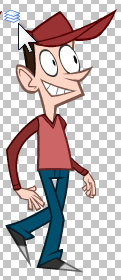
First, we are going to need some graphics to create our sprite sheet. For your convenience I have created an archive with all the graphics that we’ll need for this tutorial.
Download it from here.
Extract the content of the archive into a folder external to your project, let’s name this folder “graphics”.
Now launch TexturePacker and drag and drop your “graphics” folder into TexturePacker’s “Sprites” panel.
![]()
This simple action insures that TexturePacker picks all the images contained in your graphics folders and includes them in a single sprite sheet. Moreover, whenever you need to add more images to your sprite sheet, all you have to do is to add them to the graphics folder and TexturePacker will automatically add them to the same sprite sheet. Sweet!
![]()
All our images are .PNGs but TexturePacker reads many different graphics formats: .jpg, .bmp and even .swf!
If you have been looking closely at your spritesheet you might have noticed that although the walking guy animation is made of 16 frames (16 .PNGs in the “graphics” folder), our spritesheet only shows 8 frames. Why?
Did you notice how some of the images have a little ‘stack of paper’ icon next to them?
That is because some frames of our walking animation contain exactly the same bitmap information. TexturePacker is a smart puppy and when it finds identical images it stores them just once in the sprite sheet: no need to include the same information twice and waste some precious memory!
Now let’s tweak some settings so that we can export our spritesheet to the correct locations in our project.
First of all let’s make sure TexturePacker exports everything in a format compatible with our framework: from the “Data Format” drop-down menu choose “Sparrow/Starling”.

Before we move ahead, let me go into a tiny bit of theory to understand what we are doing next. As said earlier, a sprite sheet is a very large bitmap image that includes a bunch of sprites. In order for our application to use it correctly though, we need to tell it what are the boundaries of each individual image within the sprite sheet (if you are familiar with HTML, much like it’s done in HTML with image maps).
TexturePacker will do this for you automatically by creating two files: the texture atlas (the big bitmap image) and a file that contains the information about the images’ boundaries (a data file. usually in .xml format). This is a huge time saver: imagine having to write a data file with all the images coordinates and dimensions by hand!
So, in the next step we tell TexturePacker where to save these two files within our project directory structure. First, let’s take care of the data file. Click on the ![]() button next to “Data filename” and navigate to the “2x” folder in your project which we created earlier (/bin/textures/2x/). In the “File name” field type “atlas” and then click on the “Save” button:
button next to “Data filename” and navigate to the “2x” folder in your project which we created earlier (/bin/textures/2x/). In the “File name” field type “atlas” and then click on the “Save” button:

Let’s do the same for “Texture File”, click on its ![]() button and navigate to the “2x” folder in your project. In the File name field type “atlas” then Save.
button and navigate to the “2x” folder in your project. In the File name field type “atlas” then Save.
Done? Awesome. Now we need to tell TexturePacker that we want two different versions of the texture atlas: one at full resolution and the other at half the original resolution.
The code in the Scaffold_Mobile.as class of our project will automatically pick one or the other based on the mobile device resolution. The good thing about having a low-resolution version of our sprite sheet is that we will avoid storing a lot of bitmap data in the mobile device memory, which, especially for older models, is always very limited.
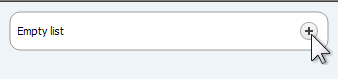
Let’s click the button with the cog icon next to AutoSD ![]() to open the AutoSD-Settings panel and click on the “+” sign in the “Empty list” box:
to open the AutoSD-Settings panel and click on the “+” sign in the “Empty list” box:
Then use the settings shown in the picture below and click on the cog icon ![]() again to close the AutoSD-Settings panel.
again to close the AutoSD-Settings panel.

What we are doing here is to tell TexturePacker to save a full resolution version of the sprite sheet in our tutorial01/bin/textures/2x/ folder and a half resolution version (Scale: 0.5) in the tutorial01/bin/textures/1x/ folder.
Now that we’re all set, click on the big ![]() button in the top toolbar and TexturePacker will automatically save two texture atlases: one in full resolution (2x) and the other at half the resolution (1x) in the respective folders we created in our project earlier.
button in the top toolbar and TexturePacker will automatically save two texture atlases: one in full resolution (2x) and the other at half the resolution (1x) in the respective folders we created in our project earlier.
If you have done everything correctly your project’s textures folder should now look like this:
2.4 Back to coding!
Now that we have our sprite sheets all set up, we are going to write a new class to use all those pretty images!
Much like we have done before for the Root.as class, we add a new class called “Scene” : in FlashDevelop’s Project Manager, right click on the “src” folder and choose “Add > New Class…”.
A dialog window will pop-up, name your new class “Scene” and choose starling.display.sprite as Base class.
Then open the Scene.as class it the editor and add the following code:
package
{
	import starling.core.Starling;
	import starling.display.Button;
	import starling.display.Image;
	import starling.display.MovieClip;
	import starling.display.Sprite;
	import starling.events.Event;

	public class Scene extends Sprite
	{
		private var guy:MovieClip;
		private var startButton:Button;
		private var stopButton:Button;

		public function Scene()
		{
			var background:Image = new Image(Root.assets.getTexture("background"));
			addChild(background);

			guy = new MovieClip(Root.assets.getTextures("walking_guy"), 12);
			guy.x = (Constants.STAGE_WIDTH - guy.width)/2;
			guy.y = 220;
			addChild(guy);

			Starling.juggler.add(guy);
			guy.stop();

			startButton = new Button(Root.assets.getTexture("start_button"));
			startButton.name = "start";
			startButton.x = (Constants.STAGE_WIDTH - startButton.width)/2;
			startButton.y = 400;
			addChild(startButton);

			stopButton = new Button(Root.assets.getTexture("stop_button"));
			stopButton.name = "stop";
			stopButton.x = (Constants.STAGE_WIDTH - stopButton.width)/2;
			stopButton.y = 400;
			stopButton.visible = false;
			addChild(stopButton);

			addEventListener(Event.TRIGGERED, onButtonTriggered);
		}
		private function onButtonTriggered(event:Event):void
		{
            			var button:Button = event.target as Button;

			if (button.name == "start")
			{
				startButton.visible = false;
				stopButton.visible = true;
				guy.play();
			}
			else if (button.name == "stop")
			{
				startButton.visible = true;
				stopButton.visible = false;
				guy.stop();
			}
		}
	}
}
This is a very simple class that should be pretty self-explanatory for an average to advanced ActionScript programmer.
Let’s take a quick overview, to see what each block of code does:
private var guy:MovieClip;
private var startButton:Button;
private var stopButton:Button;
We set the main objects for our scene as private variables: one MovieClip and two buttons.
guy = new MovieClip(Root.assets.getTextures("walking_guy"), 12);
guy.x = (Constants.STAGE_WIDTH - guy.width)/2;
guy.y = 220;
addChild(guy);
We create a new MovieClip called guy using all the “walking_guy” sprites from the texture atlas as frames and setting its speed to 12 frames per second.
Note how we don’t specify the name of each single frame image, as long as we named each frame using a progressive number as suffix(i.e. walking_guy01, walking_guy02 etc.), Starling will pick them all up in the exact order specified by their suffix.
Starling.juggler.add(guy);
guy.stop();
We add the newly created MovieClip to the main juggler so that it can be animated, then we immediately stop it. For those who are not familiar with the Starling animation system, a ‘juggler’ is a class in charge of animating objects (like a MovieClip, for example) which makes sure their animations are executed at the correct speed (12 fps in our case).
startButton = new Button(Root.assets.getTexture("start_button"));
startButton.name = "start";
startButton.x = (Constants.STAGE_WIDTH - startButton.width)/2;
startButton.y = 350;
addChild(startButton);

stopButton = new Button(Root.assets.getTexture("stop_button"));
stopButton.name = "stop";
stopButton.x = (Constants.STAGE_WIDTH - stopButton.width)/2;
stopButton.y = 350;
stopButton.visible = false;
addChild(stopButton);
We create 2 new buttons for starting and stopping the animation using 2 sprites from our sprite sheet for the graphics. Note that we reference the right textures for each button by the name of the .png file we used in the spritesheet. Also, we hide the stop button so that the start button is the only one showing initially.
addEventListener(Event.TRIGGERED, onButtonTriggered);
We add an event listener that listens for pressed buttons.
private function onButtonTriggered(event:Event):void
{
	var button:Button = event.target as Button;

	if (button.name == "start")
	{
		startButton.visible = false;
		stopButton.visible = true;
		guy.play();
	}
	else if (button.name == "stop")
	{
		startButton.visible = true;
		stopButton.visible = false;
		guy.stop();
	}
}
This function is called every time a button is pressed and depending on the button’s name, it either plays or stops the walking guy Movieclip. In any case it hides the button that has been pressed and reveals the other.
Excellent, now that we have all of our code in place, let’s compile the project and make sure it all works as it should. In FlashDevelop go to the Project menu and choose “Test Project” (or press F5). The application will now compile and you should be able to control the walking guy animation with the stop and start buttons. Click here to see a web version of the application.
Testing your app on an actual mobile device from here is not too hard, but the process goes beyond the scope of this tutorial. You can find all the necessary instructions in your project’s folder: when you created a new Air Mobile AS3 app project, FlashDevelop automatically created two text files: “AIR_Android_readme.txt” and “AIR_iOS_readme.txt”. Read them carefully, they’re both around 7-steps long, and in painstaking detail (with web links, references, and cited blogs) tell you exactly how to get your app working on your mobile device.
3. Conclusions
The application we have built is a simple one, but you can see how easy it was to handle graphic assets with the help of TexturePacker. Our spritesheets are perfectly suited for multi-resolution development, which is very handy in a market with literally hundres of mobile devices around. I hope you have enjoyed this tutorial; feel free to leave feedback, comments and questions below!

Thanks for this tutorial.
I downloaded the source code, and ran it in FlashDevelop, but I get an error: error while loading initial content.
I replaced the assets folder which was missing, but the error remains.
No bother. I was able to fix it.